Posts

Create and deploy a Discord Bot

Image
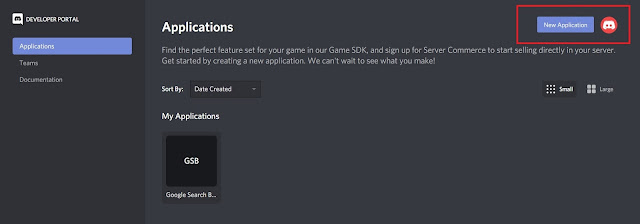
Are you interested to make a custom bot for your discord server? Don't worry!! This post will walk you through the basic steps of designing a simple bot using Node.Js. Note: Your machine should have a NodeJs of version like 12.x.x. I recommend Visual Studio editor due to the inbuilt powershell feature which makes designing and testing quite easy. Let's start by creating a discord application  as shown in the picture. Consider a discord developer application as a project. After creating the application, discord gives access to use the resources for our project/application. After this a box will be prompted on the screen as below. Type a name which suits your motive of designing the discord bot. I will just name it "Test". Now in the left panel select Bot. Create a bot by clicking Add Bot > Yes, do it! Let's switch to the editor now to design our custom bot. Open a blank directory where you want to design the bot. Open Visual Studio Code in this directory. Open a

Understanding and building Dialogflow agents to handle custom intents

Image
The  reason why we need Dialogflow is to build a conversational experience do some arbitrary actions like calling an external API and fetching the result. Google assistant is an artificially intelligent virtual assistant and so it is responsible for understanding natural language. First, google assistant matches an agent according to the information it receives from a user(action intent). For example, if someone says "fix an appointment for eye checkup" matches to some agent then that agent will be invoked in the following conversation. The following figure shows a very clear picture of what happens under the hood when we try to invoke an action. After being associated with the action the respective agent will be responsible to provide a conversational experience to the user. Having understood the basic process behind google assistant and dialogflow integrations, its time to turn the attention towards building an action. First, create a new agent for your

Three ways to deploy Node.Js applications quickly

Image
Have you developed a node application recently and would like to flaunt it? If yes, you have reached the correct page.  Before you begin deploying your project, I recommend that you upload it to git profile first. Following are three super easy ways to deploy your node project: 1.  Glitch This tool is very easy to use. After you have made a new repository for your project on GitHub, you can just easily click on "Clone from Git Repo" as shown in the image(below). Wait for some time for glitch to fetch the required files. After that a URL will be provided at which your application is hosted. Cheers, your app is live!!. 2. Heroku Although it might be super easy to deploy your project on glitch but it might cause problems on a long run.Therefore, I suggest to deploy your app with heroku. For that you will need heroku CLI.  MacOs: brew install heroku/brew/heroku Windows:   64 bit , 32 bit Linux: sudo snap install heroku --classic After doing

How to make a peer-connection using webrtc

Image
designing a simple video chat application  To get a fair idea of what we are trying to build let us examine the figure We want to build a connection between two clients so that they can share their video-streams .As it is clear from the figure that we need a mediator to act as a channel between the clients.Our purpose will be solved by a server which can connect users over the internet using their IP addresses.  Let us begin with the server. The server just needs to handover whatever it receives from one user to the other. We will establish an express server. Establishing an express server is quite easy.(First, install express package locally for your project.) const express = require ( ' express ' ) const app = express () Just these two lines will establish your express app to handle API request like GET and POST. Now,we add some configuration to our express app. app . use ( express . json ()) app . use ( express . urlencoded ({ extended : true }